A while back I was admiring some photos on Flickr by MissMae, particularly this one. MissMae was kind enough to tell me about her lightbox she had built using PVC pipe and white fabric, so I decided to build my own. Off to Lowe's I went, and purchased the following:
2 - 10' lengths of 1/2" PVC pipe (Lowe's Item # 23987)
8 - three way elbows (not shown on Lowe's website - sorry)
8 - threaded fittings (not shown on Lowe's website - sorry)
The three way elbow thingys had one hole threaded, hence the need for the threaded fittings.
Then off to Wal-Mart for 2 yards white fabric and 2 clap-on gooseneck lamps and some 100 watt CFL's. The pipe was cheap, but the fittings brought the total at Lowe's to around $14. The fabric was about $4 and the lights were about $10 each. Not counting the light bulbs, I'd spent roughly $38.
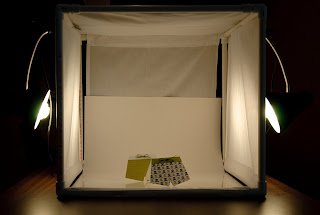
I cut the PVC pipe into 12 - 20" lenghts and assembled the box, which ends up about 24" square with the fittings. I cut the 42" wide fabric in half to make two 21" wide strips, each 72" long. One piece I cut to about 52" to span two sides of the box and allow for rod pockets on each end (similar to a rod pocket on a curtain). The other piece of fabric I left at the full 72" length and sewed pockets on each end of both strips. I pulled the pipe and fitting apart on one end and threaded the pipe through the pocket, wrapped the fabric around the box and threaded the other pocket. Likewise for both pieces of fabric. This leaves one side open for photographing. I clap the lights on to the pipe over the fabric wherever the mood strikes me, and use a piece of poster board curved along the floor and back of the box for my seamless background. I was also lucky enough to have a piece of white plexiglass laying around, so I often use that on the bottom to provide a bit of reflection and make for easy cleaning. Here's what it looks like:
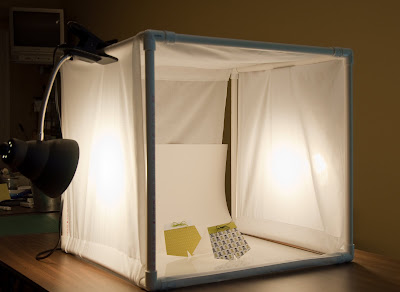
I probably should have turned more lights on when I took these pictures, but I was trying to hid the junk piled on the table in the background. LOL!
I did not glue the pipe together; it fits tightly and is sturdy without. This way I can disassemble my box and store it away (although that hasn't happened yet! LOL!) and also it allows for easy modification. Although I have about $38 in this light box, and I could have bought one at Adorama for just a bit more, I like mine. This a bit bigger, washable, modifiable, and it was fun to build.
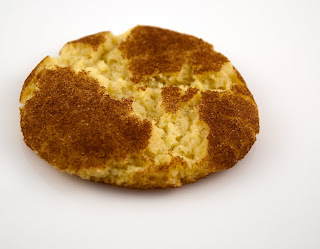
I've had pretty good results from it, although I still have lots to learn. Below you can see one of my favorite subjects photographed in my lightbox:
Tuesday, August 18, 2009
Thursday, March 5, 2009
It Pays to Play
I learned something today! It pays to play with those buttons and dials on your camera! I'm so glad I did! Here's what I was doing and what I learned about:
So, I learned today that the best way to learn is to play. Now I have to get some WORK done... Darn!
After visiting the Philadelphia Flower Show on Tuesday and getting some beautiful roses for a steal (25 for $9.95) I decided to try to get one of those dramatic shot of a rose with a black background. I hung a black cloth and placed a single rose on our bar directly underneath a small halogen spotlight (my new favorite place for shooting indoor still lifes). I put my camera on Aperture Priority, no flash, and took a few photos. This first photo is what I got:
Not exactly what I was aiming for AT ALL! Looks like a ball of cotton still on the plant - no, even that would have more contrast and definition! And, I don't like that I can see the wrinkles in my black fabric background. Do I need to get the iron out? Hmmm...
I just got my Nikon D90 in November, and I know it is a good camera, so there must be something I can do to get a better shot of this rose. So, I decided to play around with some of the settings that I haven't touched yet, namely the metering.
So, I changed the metering from the default of Matrix or Pattern metering to spot metering... a new frontier for me. I took another shot and it came out a bit better (second photo).
It has a little bit of petal detail, but I'm not going to win any photo contests with this. Heck, I'm still not going get a print or even show it to anyone, but I'm heading in the right direction.
Now, what else can I do? Oh, maybe I'll try tinkering with the Exposure Compensation... I never did that either... I know where the button is, and that I need to press and hold it down while rotating one of the two dials. Okay, let's see...
I continued to use the spot metering and set the EV at -0.7.
Now it was starting to look more like I envisioned. Okay, let's see what happens if I reduce the exposure even more... this is fun now instead of frustrating!
Oh, I can see a little something on the left edge too. I'll have to crop this one if I decide to use it for anything. I didn't do any post-processing on any of these shots in this blog entry, since I merely wanted to document what changes in the metering and exposure did straight out of my camera.
Now, I think I'll try one more... let's get crazy and really decrease the exposure...
This final photo I took using an Exposure Value of -3.0. It may be a bit too dark for some, but I like it. I like the way the stem fades into darkness. Very dramatic. It reminds me of those great covers on the Twilight series books.
So, I learned today that the best way to learn is to play. Now I have to get some WORK done... Darn!
Labels:
Exposure Compensation,
Flowers,
Metering,
Still Life
Friday, February 13, 2009
Self Portrait II - Holga-ish
I thought I could use a new profile photo for Facebook and other locations on the web, so I played around with my Gorillapod the other day trying to take a flattering self portrait. Not an easy task as you get a bit "older". Anyway... I ended up liking this one. My daughter, whose opinion I normally value quite a bit, didn't like this version where I used the Holga-ish effect on Picnik. She thought it was too altered. But, hey, she's got twelve year-old skin! I unfortunately do not!
Monday, January 26, 2009
What's Up Blue Eyes?
It just amazes me how blue my daughter's eyes look using this technique that she showed me. (Keep in mind that she is only 12!) If you haven't tried it, go to http://www.picnik.com, upload a photo, click on the Create tab, use the Black and White effect and then erase the effect from a select portion of your photo. The color really pops when the rest of the photo is black and white!
Now she tells me I'm over using this... but I just think it looks so cool! Thanks E!
Thursday, January 8, 2009
1 More Photo's Mascot
I thought 1 More Photo could use a mascot, so here she is: Nikki! You'll be seeing more of Nikki as time goes on, even if she isn't the best subject to shoot. She occasionally poses for me, like this, but she is more often a blur of black. Nikki was sitting on one of her "lookout" chairs in our bedroom when this photo was taken, using only natural light coming through the window at midday. I cropped, converted to B&W, and added the Vignette edging using Picnik.com.
Sunday, January 4, 2009
Welcome
Welcome to 1 More Photo!
This is my new blog dedicated to my renewed interest in photography and my journey of exploration using my new Nikon D90 camera. I'm not sure that the world really needs another photography blog, but what the heck. It doesn't cost anything! I'll be sharing some of the photos I take here, and maybe listing some useful links on photography. There are already many great resources on the web, so I'm definately not going to try to reinvent the wheel there. Since I am also a scrapbooker, I might also throw in an opinion or two about the use of photos in scrapbooking, but everything I post here will definately deal with photos in one way or another. I don't know if you will ever find anything here that makes you want to return... but I hope so!
Brycia
Subscribe to:
Posts (Atom)